Skating is what makes ice hockey so dynamic and exciting. That is the reason we have abandoned field hockey (just kidding).
Skates are important, but how does a person choose the right ones? Here, we consolidated all the essential information to get you started:
1. What Brand Should I Buy?
The largest share of hockey products are manufactured today by the Canadian companies-CCM and Bauer. Swiss manufacturer Graf is the third most popular skate maker, especially valued by the goaltenders. There are additional smaller companies and custom skate makers that we’re not covering here.
Products are separated by skate fit, stiffness and additional features: i.e removable blades, advanced liners, lace locking system, etc…
There are negligible differences in performance between similar products from different manufacturers, so the main problem to solve is finding a pair within the desired fit-stiffness-budget range.
Researching professional player’s gear is a common mistake and will not help you to make the right choice – chances are, your child’s feet are different from Crosby’s or Bergeron’s, his/her skating regiment is not nearly as demanding, and you are not sponsored by CCM or Bauer.
2. Skating Boots
Fit is the hands-down most important part of choosing skates. After that is stiffness. Everything else is optional or adjustable.
Length: skates are typically 1.5-2 sizes down from your regular shoe size. Ideally, when sitting down on a bench, there should be just enough room in an unlaced boot, so there is no toe-to-shoe contact, while the ankles are securely in place.
Width: this is just like with any other shoes – regular and wide sizes available. The skating boots won’t “break in” as much, especially for the young kids, so when in doubt, opt for the wider boot.
There are fans, advocates and haters of certain brands and models, however, these are all quality skates and any pair will work great as long as it fits right.
Most of the pro-shops will carry the 3D foot scanners, that will characterize your feet and point you towards the compatible products.
In the shop, skates should feel snug, but not painful. Some room for the feet to grow is fine but going 1.5-2 sizes up for the skate “to be good next season” will make your kid miserable and jeopardize his/her learning. It is important to remember that new skates will not feel comfortable – they are not sneakers. If your child is new to hockey, then he/she won’t have any idea how the skates should feel like, therefore if you’re reasonably sure you’ve got the right skate in hand, only address signs of extreme discomfort or pain – getting used to the skates will take time.
When buying your first pair, I recommend acquiring a second opinion about the fit from a trusted, knowledgeable person (a friend that plays, hockey coach, pro-shop team member).
Stiffness: Beginner skates are softer, advanced skates get progressively stiffer. Also, the softer the boot, the more comfortable it is – important mostly for the beginners. Try to bring together the 2 top lace eyelets with your index finger and a thumb: on a stiff boot, you’ll only be able to move your fingers for a few tenths of an inch.
Beginner skaters require only a fraction of support and stiffness compared to advanced and expert skaters, so putting a beginner into a pair of high-end skates will just make him/her miserable with the immobilized ankles, without contributing to his/her learning. Stiffer skates will also be more expensive due to the use of advanced materials.
Softer skating boots will give enough support to young kids. When kids start skating more aggressively stiffness can be reconsidered.
Skater’s weight considerations – heavy players will require stiffer skates since they need more support regardless of their skating abilities.
Common Mistake of Beginner Parents: When they see their child’s feet over-pronating (collapsing inwards) they tend to conclude that there is a need for a stiffer pair or try to put hockey tape to “stabilize” the ankles.
If the skates are properly tied, this over-pronation has more to do with the skate fit, your kid’s conditioning, and with the fact that it takes time to get used to standing upright on a pair of thin blades.
Bottom line – go as stiff as needed, but no more than that. Young beginners will be fine with medium to soft boots.
Everything Else:
Heat-moldable boots are recommended and will help with the fine fit adjustment, elimination of “hot spots”, and will quicken the break-in period. Skates can be “re-baked”, which is most important when buying a used pair.
However, if the skates are not fundamentally fitting the feet, heat mold won’t fix it. Graf skates, in exception, only rely on the heat mold, making their fit window smaller, compared to the CCM and Bauer.
Footbeds: Only the top-of-the-line boots will have high-quality beds. The rest will have only basic beds, which will not help much if your child pronates, even slightly. “Superfeet” branded beds are the go-to replacements, tried and approved by the skating community – recommended. Beds usually will not impact the fit, but make sure to verify it.
The tongue helps to keep the foot securely in the boot while allowing enough flexibility to support the needed range of ankle flexion. Lace bite is a big problem in hockey skating, and the tongue plays a major role in it. With that said, only the high-end boots come with the nicer tongues, and for the majority of skaters, dealing with lace bite becomes inevitable. Fortunately, simple undersocks with the gel pads like this product are cheap and very effective.
Laces: There are 2 types of laces – unwaxed and waxed. Until your kid fully adapts to the skates, stick with the unwaxed – those stretch when they get wet, making it a little easier for the expanding hot feet. In time you may try switching to the waxed, those are easier to lock, but they won’t stretch. You’ll need to experiment with the slightly tighter and looser laces until you figure out the optimum.
3. Blade Holders and Blades (Runners)
Steel (a part that comes in contact with the ice):
Stainless steel is a standard. Works great. Other types of steel are available from the original and second source manufacturers, but it’s hard to justify a need for steel upgrade for a beginner or an infrequent player. No bang for your buck.
Holders (a part that holds the steel runner): There will be slight design differences from manufacturer to manufacturer, but the two main groupings are the holders that allow the runners to exchange and not exchange. While buying non-exchangeable blades may seem like a waste, there is virtually no chance for learn to skate kids to reach the end of life of the steel on one pair – they will grow out of size long before the steel runs out.
With that, pro level holders that allow steel exchanges are a nice marketing option, that probably won’t ever be exercised on your kids’ skates.
4. Sharpening and Profiling (a geeky part)
Hockey blades are hollowed at the bottom and curvy (have a round shape) to allow quick turns and changing directions. This section covers the basics of blade configuration.
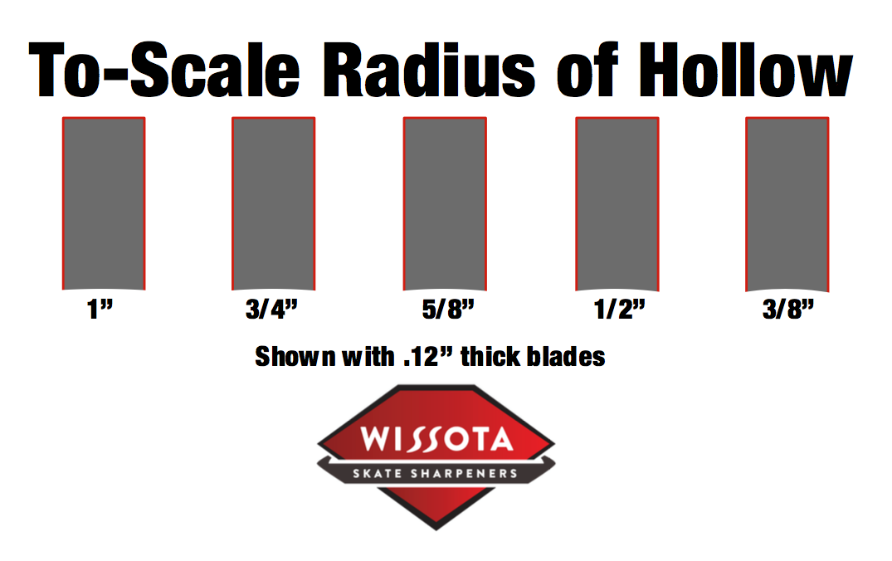
The Tadius of Hollow: This is the “notch” at the bottom of your skate steel, running through its entire length. The lower the radius the higher the edges of the “notch”, allowing a player to dig more into the ice. The first picture below shows the exaggerated cross-section of the blades with different hollows just to illustrate the concept. The second picture is to scale, and you can see only a subtle difference in the height of the edges, especially between the close radius settings.
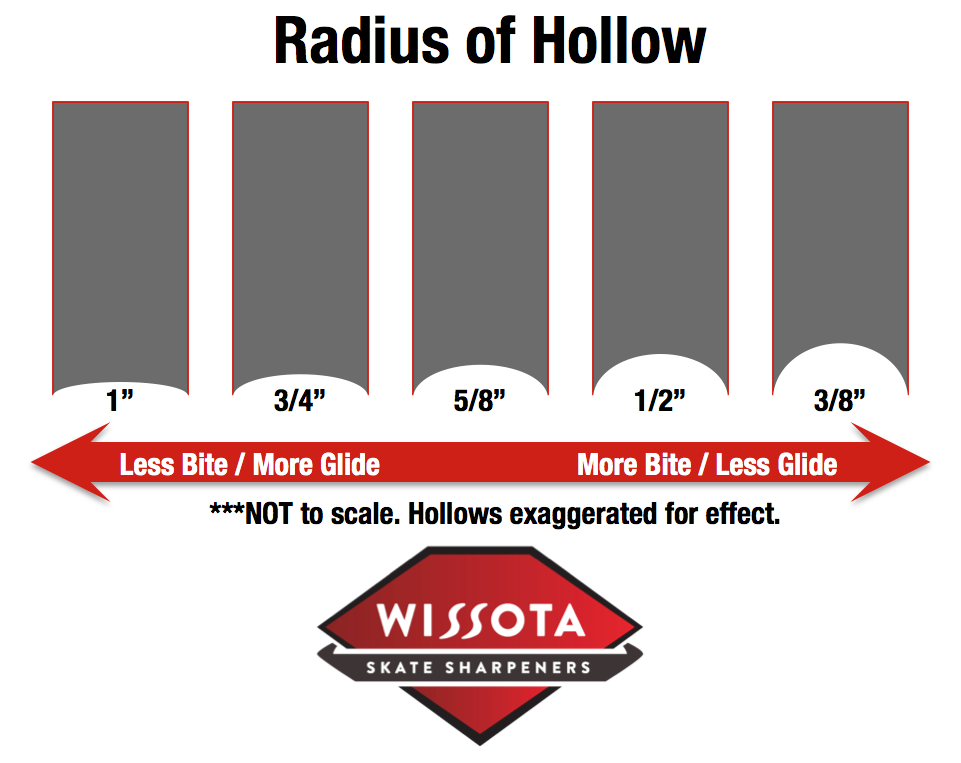
½” radius is an accepted modern mid-point, a safe setting to begin with. Future choices are down to the player’s preference, he/she will need to experiment a little bit. No right and wrong here.
Blade Profile: Profile characterizes the blade curvature. Or how much of a blade length will be in contact with the ice, when a player is in a perfectly neutral stance – not leaning forwards or backward. The profile is expressed as a radius of a circle, that if cut into the slices 6-10” long, would have an exact shape of youth or an adult skate blade; it’s measured in feet.
Few popular profiles for the skaters are 9, 10, 12 and 13 ft. Goalie skates are almost flat, profiled to 25 ft. There are also multi-radius profiles, usually curvy in the front part and flatter at the back of the blade. In theory, the flatter the curve, the more stable the skate, but at the expense of agility and maneuverability.
Additional parameters are addressed by profiling, which is a skate pitch or a pivot point. It dictates the direction (forwards or backwards) in which your balance is affected when standing on the skates. For obvious reasons, a neutral pitch (not leaning forwards or backwards) is recommended for both beginners and intermediate skaters. Experts may have different considerations.
Is profiling an absolute must? No, just avoid the extremely short (<8) or long (>13) profile radius. Consider this:
- New blades come pre-profiled to 9 or 10 ft radius from the manufacturer and are neutrally pitched.
- Profiling provides marginal gains, achievable only at advanced and expert levels. Learners won’t feel the difference.
- Even if a player is skilled enough to notice the differences, there’s no other way to know the optimal profile for a particular player, without trying a few options. “Recommended” profiles won’t necessarily work for a specific stance and skating style.
To get an additional perspective, watch a few videos of the hockey hall-of-famer, like Bobby Orr, skating in the soft leather boots and using the unknown profiles. Pretty amazing.
If you have some extra cash on hand and feel adventurous – go ahead and try some profiles. No harm for sure.
Sharpening
This is a process of resetting a depth (radius) of hollow and cleaning/deburring the edges.
There are two basic types of sharpening machines:
Manual: stationary and a fairly large machine, requires a skilled operator for consistent sharpening.
Semi-automatic: very compact and portable compared to the manual sharpener. Designed for the repeatable operation without operator intervention.
Both types need to be properly calibrated to achieve even edges and can output different Radius of Hollow – make sure to specify your preferred one.
Try a sharpening shop in your area, and if something doesn’t feel right, give them a chance to correct it for you. Mistakes happen and most of the sharpeners are proud of their craft and will make sure you’re satisfied.
Used Skates
Younger kids don’t put on a lot of stress on their skates and are out of them too fast, so typically those skates are in good enough condition to serve 3-4 children.
Bring a knowledgeable person with you and use the same fit and stiffness criteria when shopping for used pairs as if you were buying a new one. Heat moldable boots will have an advantage here, since they can be re-baked for a new skater.
Look for the significant boot (inside and outside), blade holder (incl. the rivets) and blade steel damages – minor scratches and chaffing are the normal wear and tear, but the deep scars, torn stitches, and loss of integrity or missing material are a problem. Make sure the lace eyelets are well preserved.
If the blades look worn-out, allow a lot of sharpening cycles, look in the possibilities and of replacement – it might be more economical to buy a new pair.
The Most Important key point:
There’s no reason to hesitate too long when buying a perfect first pair of skates. As soon as you’ve found the right fit within your target budget – go for it.
Everybody is awkward on the ice at the beginning and having cheap or expensive skates won’t make a difference.
Want your kid to improve as fast as possible? Stop fiddling with the skates (and sticks) and invest in professional instruction.
No shortcuts here, expertise takes time, but kids learn fast with the right coaching…and then the exciting part starts!
I blog frequently and I truly appreciate your content.
The article has really peaked my interest. I will bookmark your site and keep
checking for new details about once a week. I
subscribed to your Feed too.